Create a Personal Blog with Jekyll on GitHub

Motivation
I’ve shared my reasons for starting this blog in a separate post, How It All Began. Check it out if you’re interested.
Basic Computer Knowledge
Before we proceed, it’s important to have some basic knowledge of how computers and the internet work. When creating a website (or a blog, in this case), you need a computer to serve visitors — that’s why it’s called a server. Visitors, or technically clients, send requests from their browser to the server saying, “I want to see your content” and the server responds with the appropriate files, such as HTML, CSS, and other assets. The browser then assembles everything and the website loads. This setup is known as Client–Server Architecture:
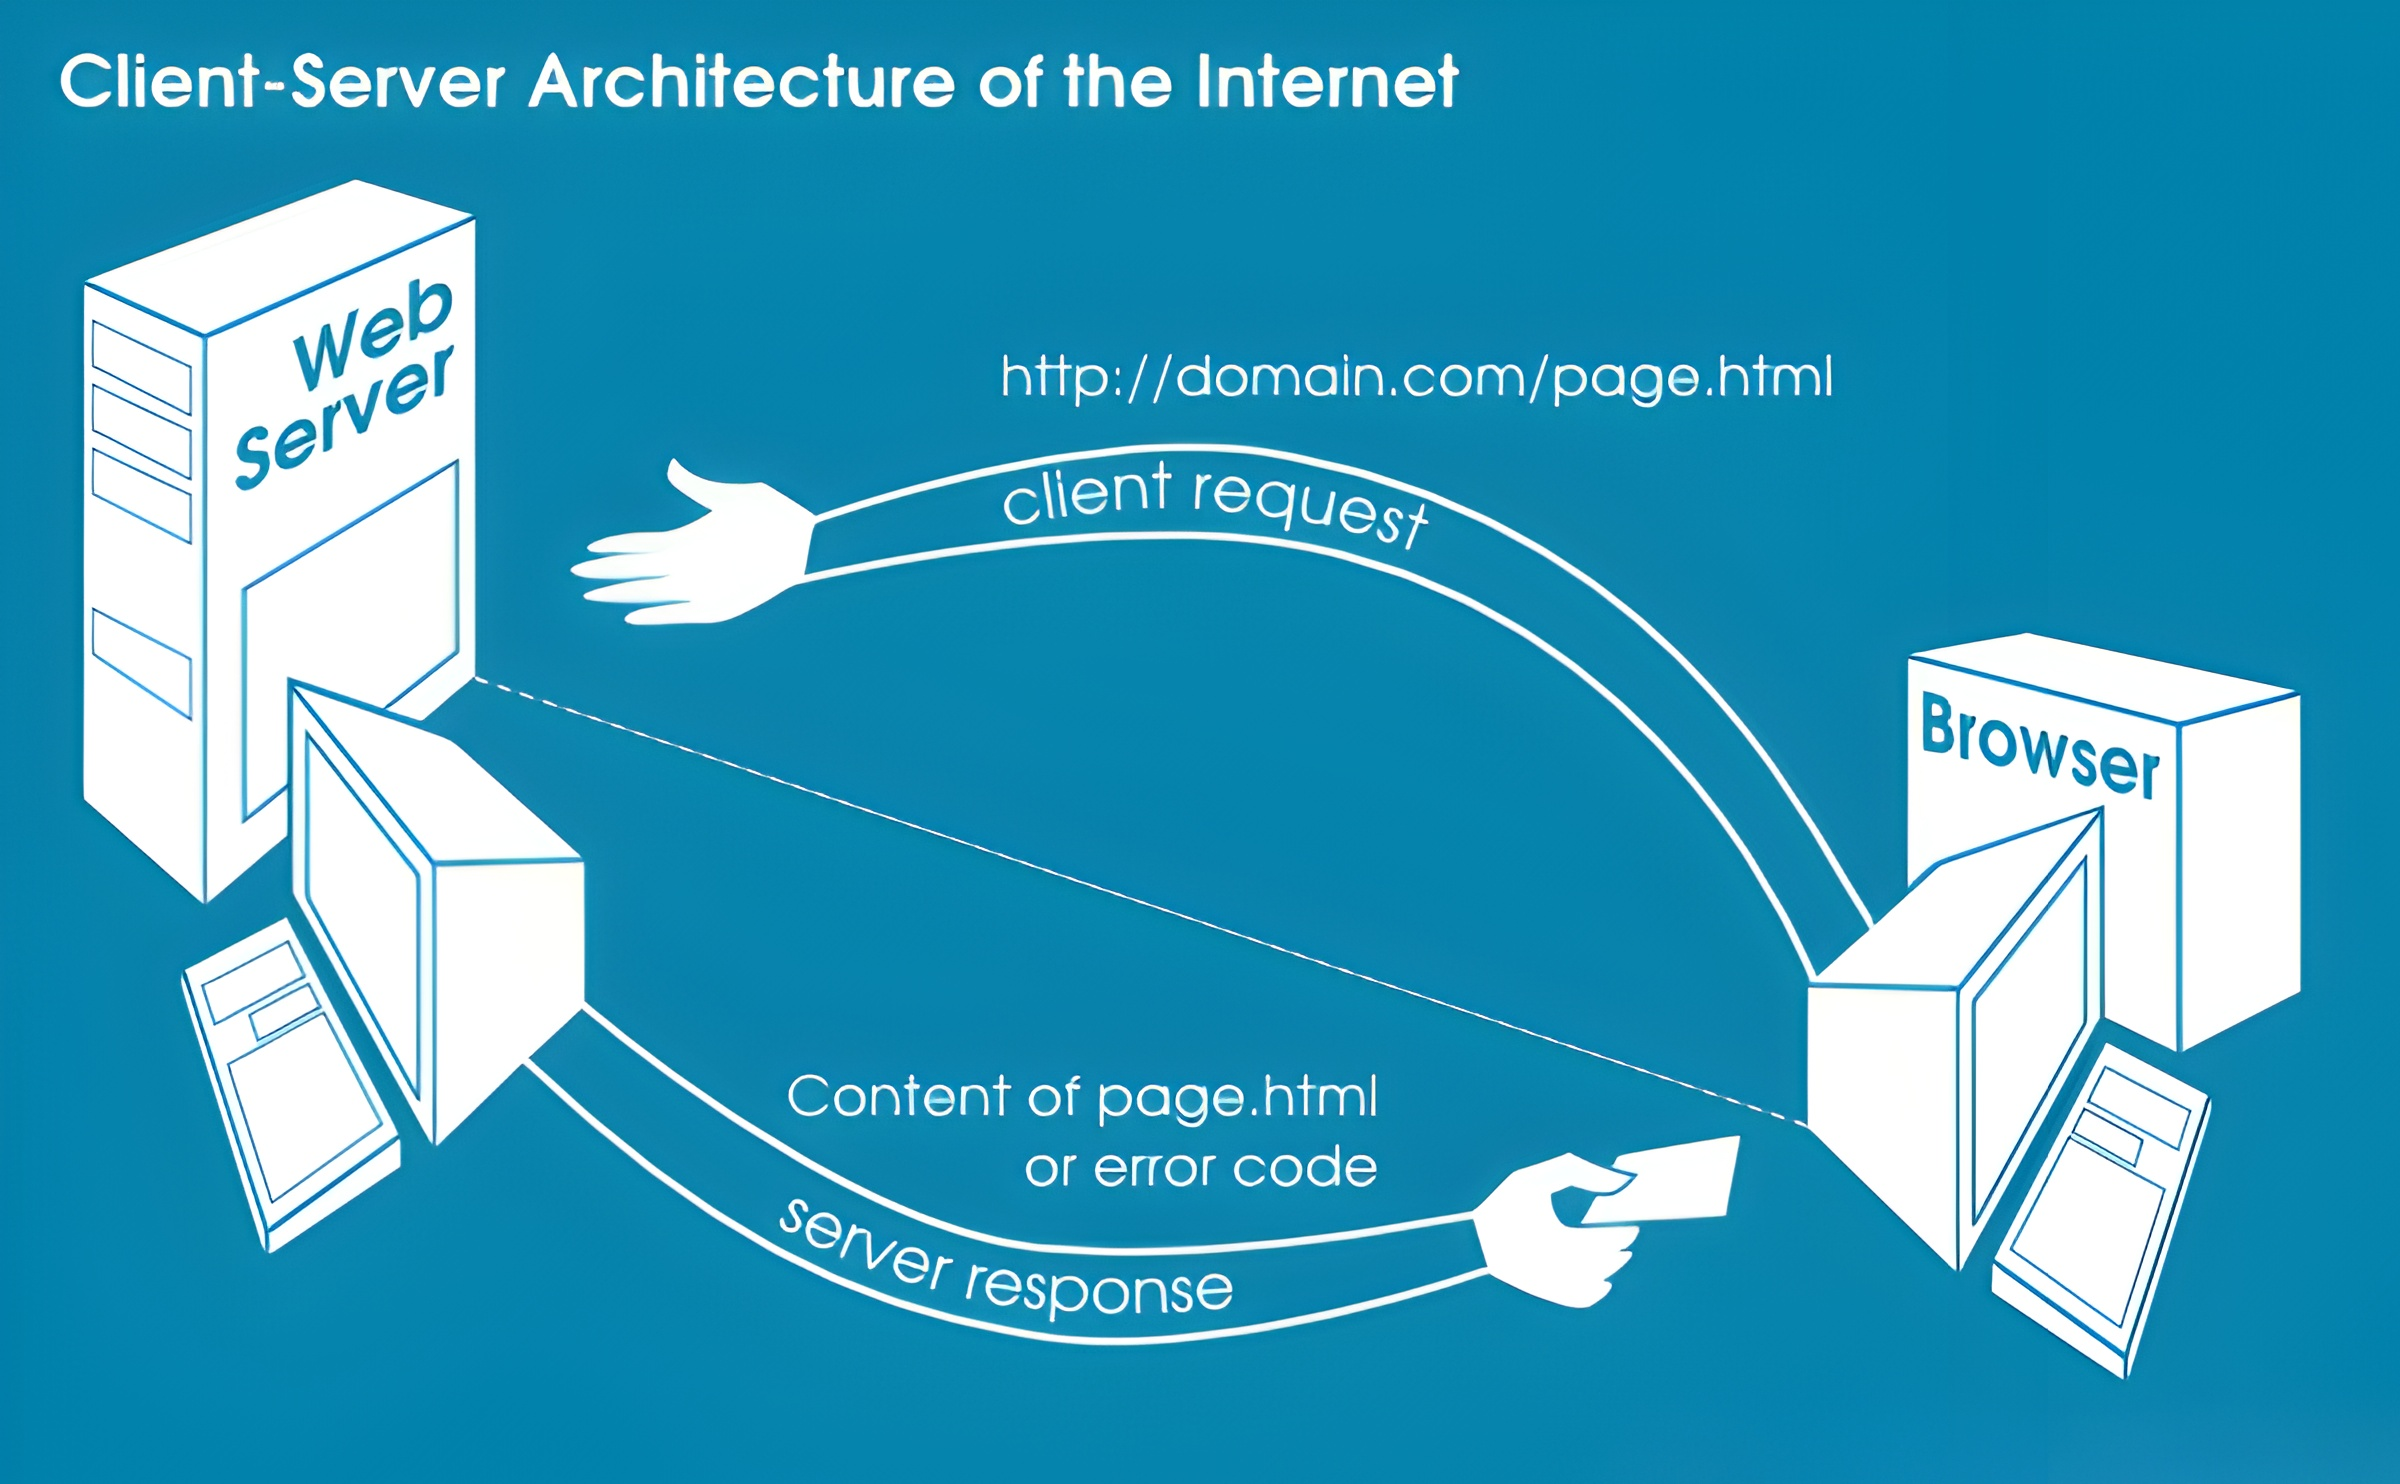 Demonstration of Client-Server architecture
You now understand why a server is needed. Servers most likely can’t be your personal PC or laptop because they need to need to run 24/7. Instead, you can rent a server from a hosting provider, which typically comes with a cost, or take advantage of free hosting options like GitHub Pages, Netlify, or Cloudflare Pages. These platforms let you to upload your blog’s source code and host it for free. I’m using GitHub for now as I write this post. Many of these services also support using a custom domain, giving your blog a more professional look.
What are domains?
Computers communicate with each other through IP addresses, which are just strings of numbers. Remembering all those numbers would be a nightmare, so that’s why we have domains and DNS (Domain Name System) to make things easier.
Think of DNS like a phone book. If you want someone’s phone number but only know their name, you look it up in the phone book. DNS works the same way: when you type a domain like google.com into your browser, your computer asks a DNS server for the corresponding IP address. The server returns the numeric IP, and your browser uses it to connect to the website.
In short, domains exist because they’re easy to remember, while IP addresses are what computers actually use to communicate.
When you start a blog on one of the platforms mentioned earlier, it usually comes with a subdomain. For example, on GitHub it’s <username>.github.io. You can also purchase a domain to replace the default domain and make your blog feel more professional.
Now that you have a basic understanding of how computers function on the internet, let’s dive into building your blog.
Independent Blogging
For blogging, the easiest option is to use a third-party platform. You don’t need to set up everything, just sign up and write; easy. Although many blogging platforms exist such as Hashnode, Medium, Weebly, and Tumblr I prefer to set up my own blog. Third-party platforms come with their own rules and restrictions, but I want full control over my content. Hosting it myself also makes backups easier, and I don’t have to worry about a platform shutting down or suddenly changing its policies.
Of course, There are drawbacks to this choice. Big platforms make it easier for your posts and profile to be discovered by their users, while publishing independently means visitors have to find their way to my blog or I need to share and promote it myself. I don’t get the benefit of appearing in other people’s feeds — but that’s fine. As I mentioned on my first post, I don’t write for attention.
Available Options
Websites generally fall into two categories:
- Static
- No login or database — just content. They are fast to load and easy to host.
- Dynamic
- Supports more advanced features like databases, user logins, and interactive content. It requires more maintenance.
For blogging, a static approach is a good fit so that’s what we’ll go with. To save time, we can use static site generators, which handle most of the setup so you don’t have to build everything from scratch.
I had to check out several options and ended up focusing on two generators: Jekyll and Hugo. They were both easy to use and set up, which is why they’re almost the go-to choice for most people. I looked through the themes for both Jekyll and Hugo, and while there were several good options, two stood out as the best fit for me: Chirpy and Stack. I chose Chirpy because:
- It’s minimalist.
- The middle of the page is dedicated entirely to posts.
- The left and right panels are laid out the way a blog should be.
Stack is indeed the same, but I like Chirpy’s dark theme more.
Most themes place author info and other details in the middle, forcing readers to scroll before they see the posts. But with Chirpy (and Stack), the layout feels balanced, visually appealing, and not overwhelming.
Another important factor for me is having two separate processes in blogging: one for writing and one for managing the blog. When I write a post, I focus only on the content — I don’t want to include any theme elements or blog-specific formatting inside the post. This way, I can back up my posts easily or switch to a different theme without needing to go back and adjust the content to match the new theme. It might seem impossible to completely separate the two, since some theme-specific elements are always needed. But since Chirpy is a solid theme and I want to prioritize content creation, I’ve chosen it. Maybe in the future I’ll build everything from scratch to achieve full separation, but for now, I’ll stick with Jekyll and Chirpy.
Now, let’s start building the base for our blog…
Configuring GitHub for Blog Hosting
Create a new repository and name it <username>.github.io, replacing <username> with your lowercase GitHub username. GitHub Pages will serve your site at the root URL https://<username>.github.io/, so the repository name must match exactly.
Once the repository is created on GitHub, navigate to Settings tab and click Pages in the left navigation bar. In the build and deployment section set source to GitHub Actions.
That’s it for the GitHub; now let’s move on to the local part.
Getting Jekyll Ready
I’ve been a Linux user for many years, so the steps below are for Linux systems. I’m using Linux Mint, but if you’re on another distribution — such as Arch, openSUSE, etc you’ll need to find the equivalent commands and packages.
First, we need to install the packages Jekyll requires, as listed on their official website:
1
sudo apt install build-essential ruby ruby-dev git zlib1g-dev
Rubyis the programming language Jekyll is built on, andgemis Ruby’s package manager. It allows you to install, update, and manage Ruby libraries and tools, like Jekyll itself.
I prefer to install all the gem packages into my user directory to avoid permission errors. To do this, add the following lines to your ~/.bashrc or ~/.zshrc file:
1
2
3
if which ruby >/dev/null && which gem >/dev/null; then
    PATH="$(ruby -r rubygems -e 'puts Gem.user_dir')/bin:$PATH"
fi
After updating your shell configuration, refresh your PATH by running:
1
source ~/.bashrc
You can then install the necessary gems with:
1
gem install exec jekyll bundler --user-install
Installing gems into your user directory avoids the need for
sudoand prevents permission issues.
Installing the Theme
First, clone the Chirpy starter repository:
1
git clone --depth=1 https://github.com/cotes2020/chirpy-starter.git
You can rename the directory and remove the existing .git directory along with any unnecessary files if you want to start fresh. This wipes out the previous Git history and tags, giving you full control over your commits from scratch. After that, you can initialize a new Git repository:
1
2
3
4
mv chirpy-starter blog
cd blog
rm -r .git .vscode
git init
We’ve already installed Bundler, a Ruby tool that manages gem dependencies for your projects. It ensures that your project uses the correct versions of each gem, making your setup consistent and easier to maintain.
Bundler uses a Gemfile to install all the required gems for your project. Before running bundle install, make sure these gems are installed in your user directory — just like we did with gem. You can set the local path for Bundler by running:
1
bundle config set --local path $(ruby -r rubygems -e 'puts Gem.user_dir')
Now, install all the gems required for the Chirpy theme:
1
bundle install
Once everything is installed, start the Jekyll server:
1
bundle exec jekyll serve --watch --livereload
If everything goes well, you can access your new website at http://127.0.0.1:4000 in your browser. At this stage, you won’t see any posts yet, because we haven’t added anything to the _posts directory. As mentioned in the Jekyll logs, you can stop the server at any time by pressing Ctrl + c.
This is the state we want to preserve for our first commit. On your local repository, run the following commands to connect your repo to GitHub:
1
2
3
4
git add .
git commit -m "Initial commit"
git remote add origin git@github.com:<username>/<username>.github.io.git
git push -u origin main
After this push, GitHub Actions will be triggered and deploy your site to GitHub Pages within a few seconds. You can check the Actions tab in your repository to view the deployment logs. Any future commits you push like this one will automatically update your blog.
Blog Configuration
Now that the setup is complete, the next step is to customize your blog. Rather than duplicating instructions here, I recommend following the official Chirpy documentation. It’s maintained by the theme’s author and updated whenever new features or changes are introduced, so you’ll always be working with the most accurate guide.
That said, here are a few tweaks I find especially useful:
- Update
_config.yml:
Start by adding your site information (title, description, author, etc.) to this file. The official docs explain each field in detail. - About and Contact Info:
Update_tabs/about.mdto tell visitors about yourself, and fill in_data/contact.ymlwith your social media links or other contact options. These links appear in the bottom-left corner of your blog as clickable icons. - Social Sharing:
It’s a good idea to have “Share This Post” buttons at the end of your posts, as they encourage readers to share your content. You can edit_data/share.ymlto add the social platforms you want, making it easy for readers to share your posts with a single click. Author(s):
Create a_data/authors.ymlfile and add your author information. This is useful because it allows you to manage author details separately from your posts, making it easier to update your info. For example:1 2 3
<author_id>: name: <full name> url: <homepage_of_author>
Drafts:
A_draftsdirectory is handy for posts that aren’t ready to publish. Once a post is finished, move it into_posts.Git won’t track empty directories. To make sure
_draftsis always version-controlled, add a.placeholderfile inside it.- Media Organization:
Underassets/, I recommend creating animg/directory for global media (like your avatar or favicon) and amedia/directory for post-specific files. This keeps things organized.
Finally, if you want to save time when creating new posts or drafts, consider installing the Jekyll-Compose plugin. It simplifies creating drafts and posts and automatically adds timestamps to filenames, e.g. 2025-xx-yy-post-title.md.
That’s pretty much it. All that’s left is to brainstorm topics and begin sharing your ideas with others. Good luck on your journey!